Laminate flooring is a popular choice for many homes because it offers a practical timber-look finish, good everyday performance, and a wide range of design options. It is also commonly selected because many laminate flooring systems are designed for floating installation, making them more straightforward to install than some traditional flooring products.
However, a good result still depends on proper preparation, correct installation, and following the manufacturer’s instructions. Before starting your laminate flooring installation, here are nine important tips to consider.
1. Inspect the Flooring Before Installation
Before installation begins, check that the laminate flooring is the correct product, colour, design, size, and quantity for the project.
Open several boxes and inspect the boards under good lighting. Look for visible damage, colour concerns, edge defects, locking system damage, or any manufacturing or transport issues.
Do not install boards that are visibly damaged or unsuitable. Once a plank has been installed, it may be treated as accepted by the installer or homeowner.
Flooring packs should be handled carefully during transport and storage. Damaged corners, dropped boxes, or poor handling may affect the locking system and the final installation quality.
2. Prepare and Check the Subfloor
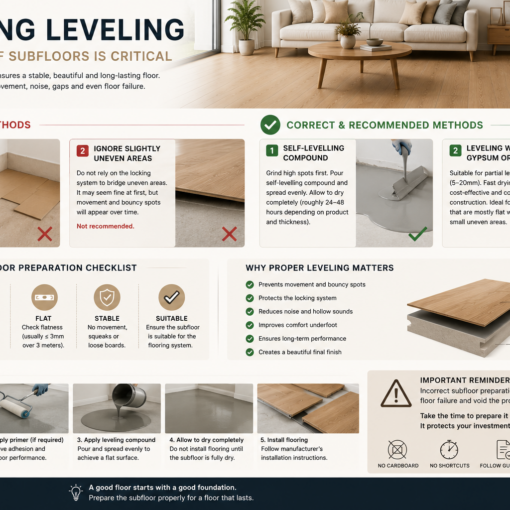
A successful laminate floor starts with a suitable subfloor. The subfloor must be clean, dry, flat, stable, and structurally sound before installation.
Remove old adhesive, loose material, dust, debris, staples, nails, and anything that may affect the flooring. Walk across the room and check for squeaks, loose panels, or movement. Any subfloor movement should be corrected before the laminate flooring is installed.
High spots and low spots should also be addressed according to the flooring manufacturer’s flatness requirements. Installing laminate flooring over an uneven subfloor can cause movement, noise, joint stress, gaps, or locking system failure.
3. Use the Correct Underlay
Underlay is an important part of many laminate flooring systems. It may help with underfoot comfort, acoustic performance, minor subfloor imperfections, and moisture control depending on the product and installation area.
For concrete subfloors, a moisture barrier or underlay with an appropriate vapour barrier may be required. For timber or panel subfloors, the underlay requirements may be different.
Always check the laminate flooring manufacturer’s instructions before choosing underlay. Using the wrong underlay can affect the locking system, floor stability, warranty, and long-term performance.
4. Keep Sawdust Away from the Locking System
When cutting laminate planks, avoid cutting directly over or near the installation area.
Fine sawdust and debris can become trapped in the locking system, making it difficult for the boards to connect properly. This may lead to small gaps, raised joints, or poor locking performance.
It is best to set up a separate cutting area and clean each plank before installation if necessary.
5. Keep the Installation Area Clean
Cleanliness is important during installation. Dust, grit, debris, or small offcuts left under the flooring can create unevenness, noise, or damage over time.
Sweep or vacuum the subfloor before installation and continue cleaning as you work. Pay attention to corners, edges, doorways, and areas around trims.
A clean installation area helps the boards sit properly and reduces the risk of particles becoming trapped beneath the floor.
6. Plan the Direction of the Flooring
Before installing the first row, decide the direction of the planks.
Laminate flooring is often installed parallel to the longest wall or in the direction of the main natural light source. This can help create a cleaner visual flow and may reduce the appearance of joints.
However, the best direction depends on the room shape, layout, doorways, hallway connection, lighting, and design preference. Plan the layout before starting and check how the first and last rows will finish.
Avoid very narrow final-row cuts where possible, as they may look poor and be harder to secure.
7. Start Carefully and Maintain Expansion Gaps
Begin installation from a suitable wall or corner as recommended by the manufacturer. The first rows are important because they control the straightness of the entire floor.
Use spacers around the perimeter to maintain the required expansion gap. Laminate flooring is usually installed as a floating floor and must be able to expand and contract naturally.
Do not install the floor tightly against walls, columns, door frames, kitchen islands, pipes, or fixed objects. Expansion gaps should be covered later with skirting, scotia, or suitable trims.
8. Use the Right Cutting Tools
Use suitable cutting tools for laminate flooring. A fine-tooth saw blade, laminate cutter, mitre saw, jigsaw, or circular saw may be used depending on the cut required.
Measure carefully and mark the plank before cutting. For visible cuts, take extra care to avoid chipping the decorative surface.
Always follow safe cutting practices and use appropriate protective equipment. Clean dust from the plank before connecting it to the installed floor.
9. Finish with the Correct Trims and Maintenance
Once the flooring is installed, remove the spacers and install skirting, scotia, transition trims, or edge profiles as required.
The trims should cover the expansion gaps without restricting the natural movement of the floating floor. Do not fix trims through the laminate flooring in a way that prevents expansion and contraction.
After installation, clean the floor using the manufacturer’s recommended method. Avoid excessive water, steam mops, harsh chemicals, abrasive cleaners, and dragging heavy furniture across the surface.
Correct maintenance is important to protect the appearance and performance of the floor over time.
Final Thoughts
Laminate flooring can be a practical and attractive flooring option for many homes. It offers a timber-look design, everyday durability, and relatively straightforward installation when the correct process is followed.
However, laminate flooring still requires proper subfloor preparation, correct underlay, careful handling, suitable expansion gaps, and ongoing maintenance.
For the best result, always follow the manufacturer’s installation instructions and seek professional advice if you are unsure about the subfloor, moisture conditions, room layout, or installation method.